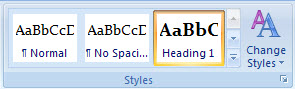
If you want to create a professional looking document, the preset styles in Word 2007 make it easy to choose headings, subheadings, and font themes that are designed to complement one another. Using the Quick Styles feature can help save you time and make your document look more polished. To get started, go to the Home tab and find the Styles boxon the right. In this box, you can choose from a range of styles and color schemes. To apply a style to a section, just highlight your text then click on the style you want. You can also use the Change Styles button to quickly change style sets, colors and fonts.
Track Changes in Microsoft Word is a helpful feature for viewing and editing revisions while you work in a document. This tool can be incredibly useful when multiple users are editing the same document. Also, if you are a professor, you can use Track Changes to add comments and make revisions to a paper. The author of the document can accept or reject each change once the document is ready to be finalized. Here are a few steps to get started with Track Changes:
Turn on Track Changes
Under the Review tab, select Track Changes. (For older versions of Word, go to Tools and select Track Changes.)
You can also use a shortcut to turn on and off track changes (CTRL-SHIFT-E).
Add Changes or Comments
1. Turn on Track Changes.
2. Make revisions directly into the document and they will show up in red.
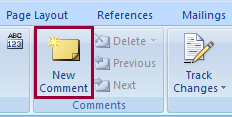
3. Click on the New Comment button to add remarks.
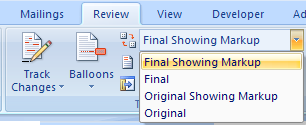
Here is what each displays: Final Showing Markup: Document with changes Final: Document including proposed changes Original Showing Markup: Original document with proposed changes Original: Document before any editing
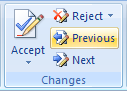
Accept or Reject Changes
To accept or reject changes, click on the appropriate button on the top menu.
Or you can right click on the change and a drop-down menu will appear with options to accept or reject.
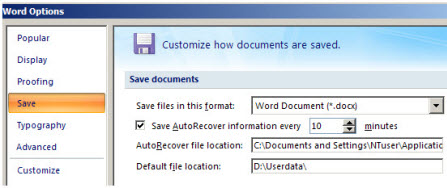
If you’ve ever lost your work due to a computer freeze or power loss then you know how frustrating it can be. In Microsoft Office, there is a way to help prevent such a disaster. All you need to do is adjust the auto-save interval time so that you know how often and where your documents will be saved. Here are the steps in Microsoft Word to set up this option; note that the steps are the same for PowerPoint and Excel:
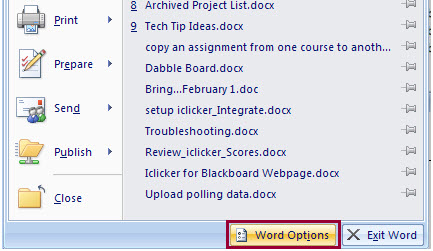
1. Click on the Microsoft Logo in the top left corner.
2. At the bottom of the screen, select Word Options.
3. Go to the Save tab.Here you can select an interval time and location for auto-saving your documents.
Reduce the Size of Large PowerPoint and Word Files
With Microsoft Word and PowerPoint, large files are almost always caused by images. You might have high resolution digital photos from your digital camera that you’ve inserted, high quality scans, or uncompressed graphics all throughout your file. Reducing file size helps alleviate complications later such as your colleague not being able to open your email attachment or lengthy download times. If you have a Word or PowerPoint file containing images that you plan to attach in an email or post to Blackboard then it’s worth compressing the images within your document.
PC users
There is a built-in option for compressing all of your images at once in Office 2003 and 2007. Follow these steps to compress your image in Word 2003/2007 and PowerPoint 2003.
Right-click on a picture, then click Format Picture on the shortcut menu.
In the Format dialog box, click the Picture tab, and then click Compress.
Under Apply to, click All pictures in document.
Under Change resolution, click Web/Screen.
Under Options, select the Compress pictures check box and the Delete cropped areas of pictures check box.
Click OK.
If prompted, click Apply in the Compress Pictures dialog box.
If you are using PowerPoint 2007, the steps vary slightly:
Single-click on a picture, then click the Format tab from the menu options on the upper right.
Click the Compress Images button on the upper left.
Mac Users
Microsoft Office does not have a built in compression feature for the Mac. However, if your image files are too big, consider converting them to JPG. You can easily convert images on a Mac by opening them in the Finder and saving them to the JPG format. You can also lessen the quality to reduce file size when you save images from the Finder. You can also use any photo-editing program such as Photoshop to reduce the size of an image. If you do not have a program like Photoshop installed on your computer, see a previous Tech Tip onfree photo-editing tools.
Once an image is included in a Word document, it is embedded as part of the file. If you would like to use an image that is part of a Word document, luckily there is a quick and easy way to extract and save images from Word. Saving a Word document as a Web page (from Word 2000 on) will separate the text from images as separate files.
To save your document as a Web page, select (File >Save as) then choose Other Formats. From the pull-down menu, next to Save as type:, select (Web page *.htm; *.html), then save. Two components will be saved; a folder, which will contain the image files along with a separate .htm file. Find the image files you’d like to use and you may delete the rest, since you will still have the original Word document.
Microsoft Office Templates for Just about Everything
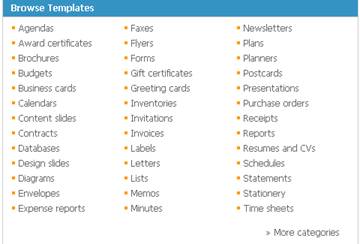
Why be satisfied with that old PowerPoint, newsletter, fax, or memo design, when you can get an exciting new one for free from Microsoft! You can find templates for brochures, calendars, greeting cards, labels, memos, invitations…even floorplans, paper folding projects and tournament brackets!
Click on the category you are interested in and you will get a list of templates with descriptive information, including which application and version of Office the template is compatible with. Once you find the template you want and click the Download Now button, the template will open in the corresponding Office application.
You can find templates for Microsoft Office for Mac at the MS Office for Mac.