Month: April 2010

Easily Capture a Screenshot

Easily Capture a Screenshot

A screenshot is an image taken of the computer screen or a portion of the screen. These images can be useful for creating a demonstration of a program or even for recording a problem on your computer. You can easily take a screenshot on a Mac or PC without installing additional software.


For PC

  1. On the upper right-hand side of your keyboard, press PrtScn.
  2. The screenshot will be copied onto your clipboard. Open any image-editing program like Paint and click on Paste or use the keyboard command: Control-V.
  3. Save the image.

For Mac

  1. On your keyboard, press Command (Apple Key) – Shift – 3, in this order, to capture the entire screen.  Or press, Command – Shift – 4 to highlight and select an area of the screen to capture.
  2. The image will be saved to your desktop.

Screen Capture Software

If you are interested in more advanced features for taking screen captures, there are quite a few useful programs out there.   SnagIt, for PC, allows you to edit your image by highlighting areas, adding call-outs, arrows, text and more. Snagit is very useful for creating tutorials; it runs about $50.  SnapzPro, for Mac, enables you to record anything on your screen and save as a Quicktime movie; it runs about $70.

Save Web Forms as you Type with Lazarus

Save Web Forms as you Type with Lazarus

If you’ve ever lost your work when typing in an online form, posting content to Blackboard or writing webmail, then you know how frustrating it can be!  Next time you can prevent this inconvenience by installing a very helpful Firefox add-on, Lazarus: Form Recovery. Lazarus automatically saves the text you have entered in a form, blog response or even an email and allows you to easily recover your work.  

After installing Lazarus, all you have to do to recover text in a Web document is return to the Web page and right-click on the field where you lost the data. You will have the option to recover text or to recover a form depending on what you need. After you select an option, the text is automatically re-entered.  You can also keep your data secure by setting Lazarus to require a password to restore your forms.

Track Changes as you Edit in Word

Track Changes as you Edit in Word

1X1Track Changes in Microsoft Word is a helpful feature for viewing and editing revisions while you work in a document. This tool can be incredibly useful when multiple users are editing the same document. Also, if you are a professor, you can use Track Changes to add comments and make revisions to a paper. The author of the document can accept or reject each change once the document is ready to be finalized.   Here are a few steps to get started with Track Changes:

Turn on Track Changes

Under the Review tab, select Track Changes. (For older versions of Word, go to Tools and select Track Changes.)

track-changes

You can also use a shortcut to turn on and off track changes (CTRL-SHIFT-E).

Add Changes or Comments

  • 1.      Turn on Track Changes.
  • 2.     Make revisions directly into the document and they will show up in red.
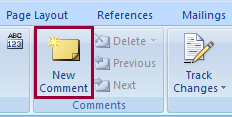
  • 3.      Click on the New Comment button to add remarks.

track-changes-new-comment2

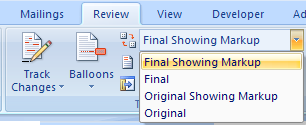
Here is what each displays:
Final Showing Markup: Document with changes
Final: Document including proposed changes
Original Showing Markup: Original document with proposed changes
Original: Document before any editing

track-changes-views

Accept or Reject Changes

To accept or reject changes, click on the appropriate button on the top menu.

accept-changes

Or you can right click on the change and a drop-down menu will appear with options to accept or reject.


To learn more visit:

http://office.microsoft.com/en-us/word/HA012186901033.aspx